


Servers are the heart of the internet and learning how to communicate with them is an essential skill, especially when accessed remotely.
In this blog, we are going to learn how to establish a connection to remote servers using SSH (or Secure Shell) protocol. For this, we are going to use a VM (Virtual Machine) to simulate a remote server (referred to as Guest OS) and our local machine (Host OS) as the client.
Note: As most servers today run on Linux, in this example, we are going to use Linux as the kernel for both the host and the guest machine.
Why ssh?
Let us understand why SSH was born and how important it is today. Before SSH, the telnet protocol used to be the standard. Communication on the telnet was highly insecure as it involved no encryption and anyone on the same network had open access to the data flowing through the network.
In comes ssh, a secure protocol that encrypts all traffic between the client and the server to eliminate unauthorized access, allowing us to communicate securely on the network. It is a reliable method used by millions of servers today and we will be using it in this example.
Prerequisites
Oracle VM VirtualBox [For creating a VM]
For this example, I will be using lubuntu as the guest OS because it is lightweight and uses the same package manager as the host OS (Pop_OS).
OpenSSH
An open-source connectivity tool for remote sign-in using ssh protocol.
Installing OpenSSH
To create an SSH connection we need both the client and the server to have openssh installed and doing it is relatively easy.
1. Installing the OpenSSH client
The openssh-client will be installed on the host OS which we will be using to connect to the VM. Before moving forward make sure to check if the client is already installed:
Open your terminal
Type
sshand hit EnterIf the client is already installed the console will print something similar as below:
silvergraph@pop-os:~$ ssh
usage: ssh [-46AaCfGgKkMNnqsTtVvXxYy] [-B bind_interface]
           [-b bind_address] [-c cipher_spec] [-D [bind_address:]port]
           [-E log_file] [-e escape_char] [-F configfile] [-I pkcs11]
           [-i identity_file] [-J [user@]host[:port]] [-L address]
           [-l login_name] [-m mac_spec] [-O ctl_cmd] [-o option] [-p port]
           [-Q query_option] [-R address] [-S ctl_path] [-W host:port]
           [-w local_tun[:remote_tun]] destination [command [argument ...]]
If not then you can install it using the below command:
sudo apt-get install openssh-client
We can now make a connection request from our local machine to any remote server with the server-side application via SSH.
2. Installing the OpenSSH server
We will now install openssh-server which is a server-side application on the guest OS to enable the VM to accept SSH connection requests from the host.
As always make sure to check if it is already installed or not. We can do this by connecting to the localhost
Open your terminal
Type
ssh localhostand hit EnterIf the application is not installed already then the console will show something like the below:
silvergraph@pop-os:~$ ssh localhost
ssh: connect to host localhost port 22: Connection refused
Installing openssh-server is very simple. Follow the steps below:
Open your terminal
Type the following command and hit Enter
Type y and hit Enter to allow the installation to continue after the prompt
sudo apt-get install openssh-server ii
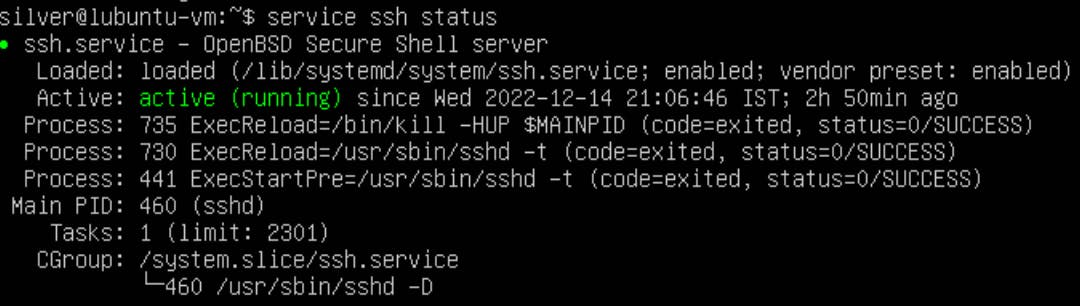
Now that we have the openssh-server successfully installed we can check if it is running or not using the below command:
sudo service ssh status
If the response in the terminal is something like the below then the SSH service is running correctly and is ready to accept SSH connection requests from the client.
In some cases, we need to start the server manually even though openssh-server is already installed on the machine. To start listening to requests via SSH, type the following command in your console and hit Enter:
sudo service ssh start
Well, pat yourself on the back if you have reached this far! We can now move on to the main stuff that we all had been waiting for and that is establishing a connection between our client (host OS) and the remote server (guest OS).
Establish a connection
Before we move on to get our hands dirty, there is one configuration that we need to especially take care of and that is the network adapter that the VM is using.
On your VM image settings go to the Network tab and make sure that the network adapter is selected to Bridged Adapter as shown in the image below. This will enable all the hosts on our network to access the VM.
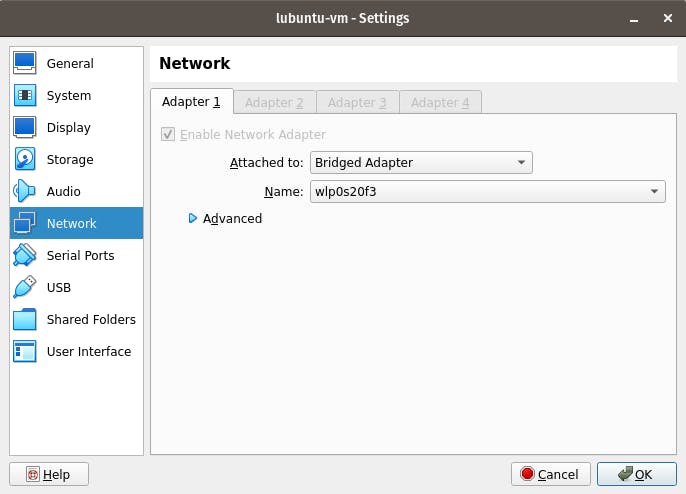
By default, it is configured to use a NAT adapter. You can find more about it here.
How to connect
Now that we have taken care of the important things we can send an SSH connection request to our server easily through our client. After establishing a connection we can use the guest OS's username and password for authorization.
Go through the below steps:
Find the server's IP address using the below command on your guest OS terminal
$ ip a
Below is an example of the output and where you can locate the IP address.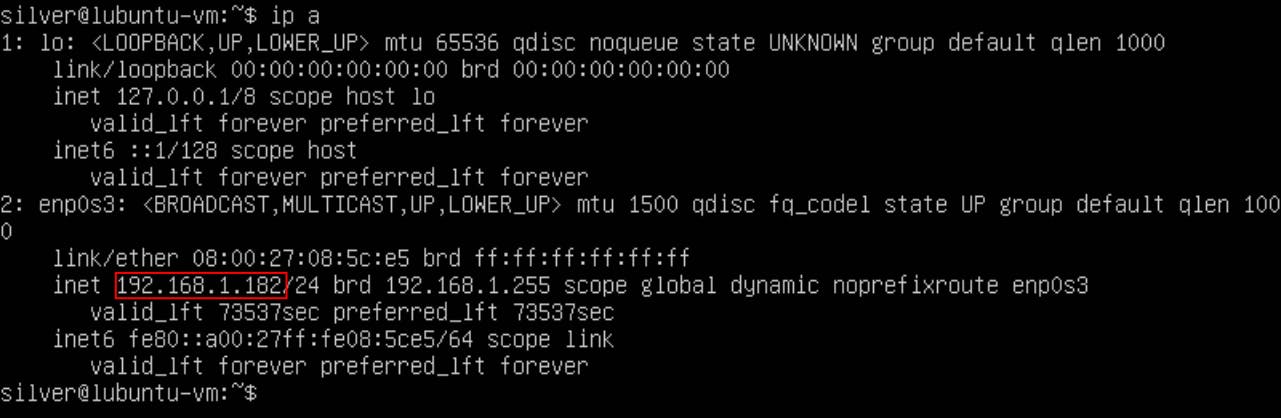
Open the terminal on your host OS and type the following command
$ ssh your_guest_os_username@guest_os_ip_addressYou will be prompted with the following message when establishing a connection for the first time. That's because the remote server is not identified on our local machine. Type yes and hit Enter

Type the password and hit Enter. The local machine saves the ECDSA key fingerprint so we can connect directly to our server in the future.
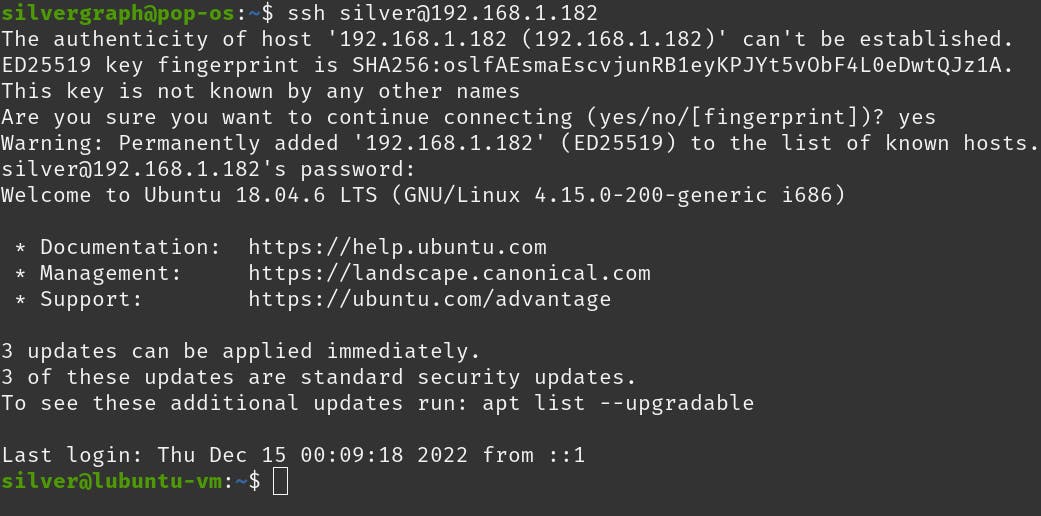
From the above image, you can observe that the console changed to silver@lubuntu-vm , which means we are now accessing the remote server's console through our local machine.
P.S*.: You can abort the connection at any time by typing exit in the console.*
Congratulations! You can now manage, control and command your remote server through your local machine.
Troubleshooting tips
Make sure the username, password, and IP address are correct
The port that the SSH daemon is listening to (port 22 by default) is not blocked by the firewall. If it's the case then use the following command to open the port
sudo ufw allow insert_port_number
- OpenSSH is installed properly
That's it from my side. This is my first blog and I'll be honest I haven't written in quite a while since my school days. In case I missed something or have any suggestions please feel free to share the same.